Followers

Friday, March 31, 2017

Potions on the Sin City Inspiration team blog

Today it's my turn to show you some inspriation on the Sin City stamps dt blog, hope you have fun checking out my potion receipe there, step by step instructions included (use at your own risk)


O and don't forget to check out the rubber stamp set I designed for them
see link here

Thursday, March 30, 2017

stamps and misters a quick card

I made a quick card using rubberstamps by Sin City Stamps and Deco Art Media shimmer misters in Turquoise and Violet


Stamps used
face : http://sincitystamps.com/face-profile-line-art-rubber-stamp/
flourish: http://sincitystamps.com/fancy-curls-flowers-flourish-art-rubber-stamp/
sequin waste: http://sincitystamps.com/sequin-waste-light-art-rubber-stamp/

How to video here

don;t forget to check out the stamps designed by me at Sin city, image and link in the sidebar :-)

Wednesday, March 29, 2017

cats

I got my hands on the stamp sets designed by Rick St.dennis available at Sin City stamps, and I thought to have a play with the Cats set see the set below


Since we have 3 cats, they demanded I got the set, and you better listen to what you cats tells you to do, or you get the death stare or worse.....

I made a little fun tag, hope you like it


Products used:  Sin City stamp set Cats
Deco Art Americana acrylics in Lilac and Lavender and Gesso and Matte Medium
Deco Art stencil designed by Andy Skinner Halftone
And Stampendous stamp by Andy Skinner; Toxic


Fist I gessoed the tag and painted it Lavender, next used the stencil to make the dots.
Stamped the stamp on paper using Archival ink andcoloured it  using pencils, next cut it out.
(stamp it on the tag to get the whiskers on there so you don;t have to cut those out)

Use the Toxic stamp with archival blue ink on the tag (the scratches looked like there had been a cat fight in my mind)

adhere the image to the tag using matte medium.

next stamp the sentiment using alphabet stamps, and to finish add a ribbon to the tag and a little bow to the duck's neck.


I will enter the following challenges


Tuesday, March 28, 2017

Awesome news

Hi  all, I finally can show you the rubber stamps I designed for Sin City Stamp, I hope you all like them.

Here is a first project sample i made using my designs.


Sin City Stamps Used : The Wildflower set (designed by me ....how cool is that?) 

Americana Neon Lights in Knock Out Blue and Pink Explosion
Dazzling metallics in: Teal and Berry
Metallic Lustres in Fab Fuchsia and Brilliant Turquoise

 Dutch doobadoo stencil and Tim Holtz gear dies

First I made the background  using the Americana Neon paints and because Alice's world is surreal and my worl too (ya what can I say....) I thought to make the ground pink....and ofcours the sky blue.

Next I stencilled the checks using Dazzling Metallics and to complete the weard world of Alice I used my own stamp designs (it's sooo cool to be able to write "my own stamp designs" sorry bout that  but just super exited I got asked to do this ). To get this world I thought of I could either go mask or just use the stamps on paper and cut them out, since masking would have had the risk of paint getting under the mask and it would mean fussy cutting too, I went for oprion 2 :-).
I coloured the stamps using colored pencils (Crayola nothing fancy) and used Matte Medium to glue them on the page.

The Wildflower word comes in "my"stamp set too, the rest of the senti I wrote using a Deco Art glass marker, they work great over acrylic paint.

I finsihed the page giving it a frame of gears using the Tim Holts die and black cardstock. The gears were coloured using the metallic lustres and glued to the page using tacky glue.


In my brain Alice is asking where to go and the scary flower is asking the heart vine if Alice is a wildflower, sorta  like in the book, just different flowers

Hope you like the page. The journal I used is a small Moleskine.

here a view of the complete stampset, now available on pre order for 14.99 USD for the coming 2 weeks, next it will go back to it's regular price of 18.99 USD, so I would suggest to go get them fast to save some money :-)


I will enter the following challenges

http://stampedblessings.com/heartfulstamping-challenge/

http://mixedmediaworld.blogspot.nl/2017/03/mmw23-anything-mixed-media-goes-with.html

http://theartisticstampercreativeteam.blogspot.nl/2017/03/marchs-creative-challenge-springtime.html

http://sandee-and-amelie.blogspot.nl/2017/03/sandee-march-2017-challenge-part-two.html

Thursday, March 23, 2017

SinCity Sugar Skull bloghop

Hi everyone,  welcome to my blog, and thank you Sin City Art Stamps for hosting a blog hop on my favorite subject Sugar Skulls. Al inspiration team members were kindly given a sheet of the Sugar Skull stamps designed by the talented Michelle Frae Cummings.


The premise of this blog hop is for you to meet our in house Inspiration team members along with a few guest members, discover more ways to create with these stamps and possibly win a set for yourself!

No matter where you have started, To qualify to win your own Day of the Dead Sugar Skulls stamp set, (we are giving away 3!) we ask that you visit each of the blogs participating, leave a nice comment and then come back to the Sin City Blog and let us know which blog projects you liked the most and why.

The blog hop will end on the 27th and the 3 winners will be announced on the Sin City blog and on our FB Fan Group on March 28th


If you'd like to see more inspirational projects using Sincity stamps , please check out the DT blog here and the facebook group here.


Blog Roll below at the end of the post......sooooo here it comes....taaadaaaa...my project for the hop......is a Sugar Skull Shrine (duh!)

The skull was stamped into clay and painted after the clay had dried. I made a video how to stamp into clay for my You Tube channel and it shows you not only the stamping but also the painting of this skull. Here is a link to the video (please subscribe to my channel so you won;t miss any of my videos)

Supply List:
Sugar Skull stamps by Sin City (both the skull but also the flower stamp in the backgound are on that sheet)
Deco Art Products:
For the Skull: Americana acrylics in: Sea Breeze, Carousel Pink, Antique White  Moon Yellow, Lamp Black. Triple Thick Gloss Glaze.
For the Shrine: Deco Art Media Gesso and Americana acrylics in Lamp Black,  Neutral Grey, Grey Sky and Driftwood. The Gold paint is Dazzling metallic Emperors gold.

For the Shrine I used Tim Holtz dies the big and small Cabinet card die, and chipboard.  I will have a step by step how to make the shrine for you on the Sin City Inspiration Blog soon, so follow the blog and you won't miss it :-)

All instructions on ow to make the skull ar in the video mentioned above, the roses are bought paper roses, I cut of the wire they were on and gave them a layer of Triple Thick Gloss to make them look like they are made of porcelain, and when dry I adhered them to the shrine.

here some more pictures
 I realy love how the background turned out using the flower stamp that is also onn the Sugar Skull sheet

I used my favorite colors to paint Mr. Sugar Skull, love his moustache


So tha's it folks, please check out the rest of the blogs in the hop and don't forget to check out the give away.
If you'd like to see more inspirational projects using Sincity stamps , please check out the DT blog here and the facebook group here.

Thanks for visiting

Blog rol:
  1. Sin City Stamps
  2. Michelle Frae Cummings
  3. Katie Lamb
  4. Chris Pozzi
  5. Irit Shalom
  6. Shilpa Nagaonkar
  7. Sharon Rogers
  8. Jenn Gary DuBell
  9. Monique Van Dijk
  10. Adam
  11. Kim Johnny
  12. Granne
  13. Anne

Sunday, March 19, 2017

How to make an art journal using envelopes

 Deco Art Products used: Americana Acrylics in : Lemon Yellow, Titanium White, Banana Cream, Bright Green, True Blue, True Red, Aqua Sky, Jack O Lantern Orange, Lamp Black, Baby Pink, Lilac, Purple Pizzazz, Red Iron Oxide
Metallic lustre: Burnished Brass
Deco Art Media matte varnish.
Americana Acrylic Gesso
Andy Skinner Stencils: Creativity, Fossil, Halftone, Time Warp, Distressed Digits, Code Breaker, Bubbles

 I did a series of 3 videos on how to make this journal using envelopes.

You can see all pages in there, here just a few.


Links to the videos:

Part 1 Gelliplating the pages
Part 2 Making background using stencils
Part 3 Assembling the book and how to make the covers


#ARTIfacts


Life has been so busy I completly forgot to post about #Artifacts.

I have been looking at bullet journalling and decided it was not for me, and while I was thinking how to keep track on my deadlines and important appointments  I came across the Artifacts Idea by Seth Apther, check out his blog here.


In these modern days everyone keeps theire agenda in their cell phones and allthough my phone is always within reach it does not work for me, I need to make lists, on paper, preferably on nice colored, decorated paper in a book that feels good when you hold it in your hands. (yah I know I am funny that way)


So instead of buying a agenda I thought to give the Artifacts idea a chance, and to be honest I am not doing it the way Seth does (see his pages here), I just make it work for me.


When  I saw this book I had to pick it up, it's the quote on the front and the fabric cover that caught my attention. I picked it up and it felt right. it has lined pages so that's perfect the only downside is the paper is thin, too thin to really have wet media on it. But hey hoo, we know how to work around that don't we, just glue 2 pages togehter and voila.....


Ofcourse the inside needed some changes so I did some decoration using patterened paper and added a pocket. (I have notes lying around everywhere so I can now put them all in the pocket till they are done and can be thrown away)


 Next I started my pages. January  I wrote down some goals and some unexpected news, that I can share now but in January it was still top secret, it's written underneath the tag  not visable for everyone but still in my book.

BTW the news is I am designing rubber stamps for Sin City Stamps (yep I am in their DT as well). Kim saw a drawing I made and she asked if I would be interested in designing for Sin City (DUH!).
I think they will be in the shop in April, I will keep you posted.

So January started out great , I also reached 300 subscribers on my youtube channel, there is more but I can't share that yet :-).  I am allowed to keep some secrets don't I?

 Next page is the actual planner, on one page all dates and the things I needed to remember on the right some info just for me.  Also notice my notes are a mix of English and Dutch lol, it's strange but most of my personal stuf and my paying job stuff goes in Dutch and everyting Art related in English.

So while I was working with this journal I thought it would be nice to keep some memories in there too, and also decided the art for some monthly challenges I participate in, would get in this book too.
In January I went to a Green Day concert and the ticket is now in my journal


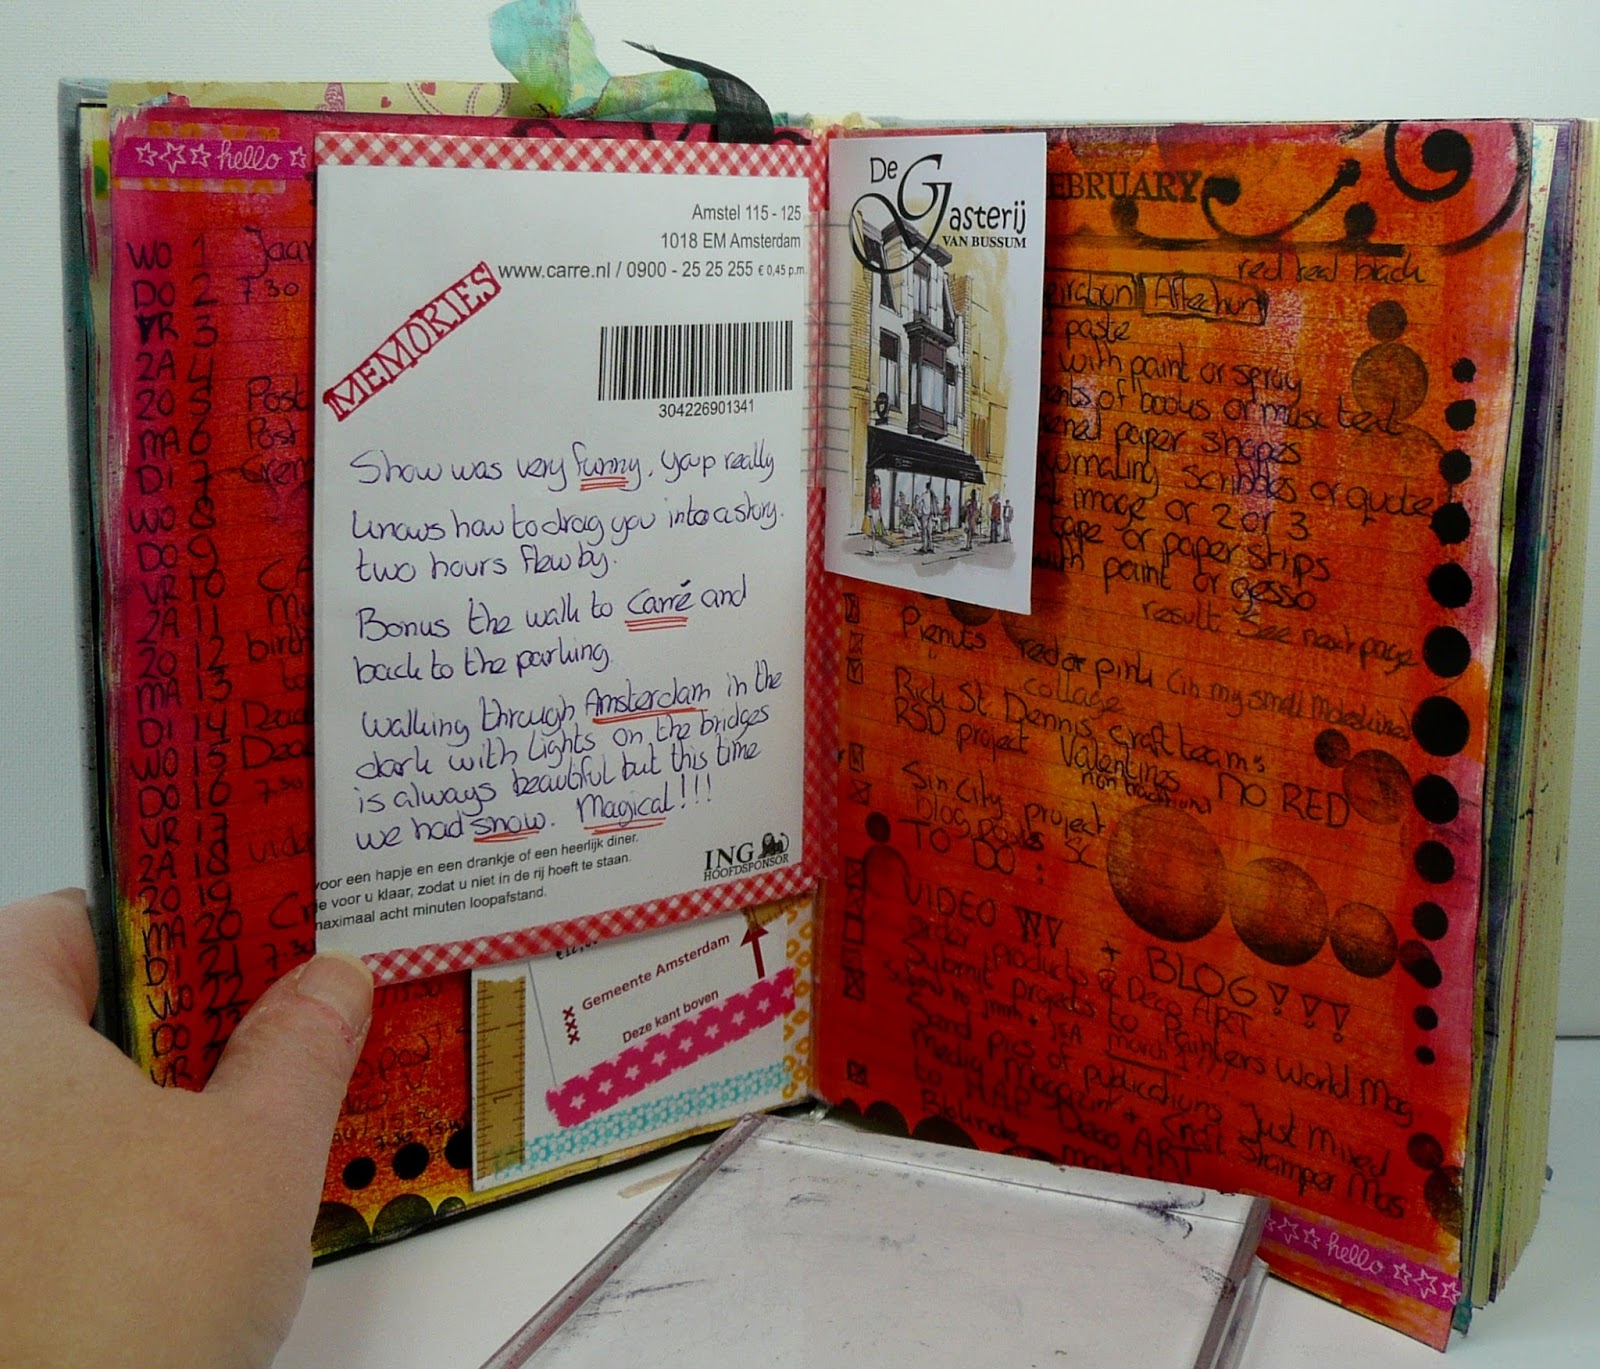
 February the month of my Birthday, and some important paying job dates.   I liked the tag concept so used it again.
 A theatre ticket to Carre in Amsterdam, the parking ticket and on the back of the ticket I wrote down some memories, just s short description of the theatre visit and walking through a snowy Amsterdam in the evening (you should try it, it's beautiful)
 A card from the restaurant wehere we had my birthday dinner,  and on the right page prompts for the challenges I do monthly, see below the result.

 thereis a video about this page here


Also I attended an on line course called "de Betekenaar" in which you learn to make things clearer using drawings rather than words, It was a 4 day trial and I decided to do the lessons in my book.


the tag thing again....
and some cards I found in my craftroom


March....along the way I decided to keep out as much of my paying job stuff as possible, this has become my Agenda, meets Art Journal, meets diary book and I decided it's for the fun stuff only (most of it anyway, you will still see some important stuff notes in there like we needed to vote March 15 th, and I had to do my annual blood test needed for the medicines I take)

Not a lot else there , just the usual monthly deadlines for my DT's and challenges, a schedual for posting on my you tube channel. I hope in future there will be more art related things in there, more like Seth pages about demoing and workshops. Well who knows one day, like the cover says Dream Big Never Quit......


Image Transfer


Deco Art products used: Americana Acrylics in Lemon Yellow, Snow White, Lamp Black, Bright Green, True Red, True Blue, Aqua Sky, Purple pizzazz.
Americana Decor Image Transfer Medium
Deco Art Media Gesso and Matte Varnish
Stencil: Americana Tie Dye


Deco Art products used: Americana Acrylics in Lemon Yellow, Snow White, Lamp Black, Bright Green, True Red, True Blue, Aqua Sky, Purple pizzazz.
Americana Decor Image Transfer Medium
Deco Art Media Gesso and Matte Varnish
Stencil: Americana Tie Dye


For both canvases I used a laser copy of a  Freddie Mercury image found on the internet . I followed the instructions on the jar. It's not hard to do, just be careful because you might remove some parts of the image while rubbing away the paper.

The background was made using stencils over a yellow  and orange background (I added the paint using a sponge and mixed it on the canvas.

Next it is just layering using stencils and paint just like I did in the video on making an at journal here


I worked the same way on this canvas first added red, purple and aqua sky to the background and next used the Tie Dye stencil with green and yellow acrylic.

Next I made marks like in the video mentionned above.


Thanks for visiting


Sunday, March 12, 2017

How to make your own art journal; Part 2, use stencils

Part 2 of the how to make your own art journal tutuorial. In this video I show you how to create a background with stencils and some items you can find in your house.  The art journal will be made of envelopes (size 16,2 cm x 22,9 cm.) and in part one  I used the Gelli plate to decorate 1 side of the envelope, so now it's the other side that gets decorated.
Part 3 will be the binding of the book and making the covers. Please subscribe to my channel so you won' t miss it.

Products used:
Deco Art Americana acrylics in:  Bright Green, Aqua Sky, Snow White, Ultramarine Blue, Purple Pizzazz, Lamp Black, True Red, Baby Pink, Orange twist. .Deco Art Stencils by Andy Skinner: Distressed Digits, Time Warp, Bubbles, Code Breaker, Alphabet Spagetti, Half Tone, Fossil.

Part 1 can be found here:
 https://www.youtube.com/watch?v=jNg0bLSm9CI